
Fluke Calibration and Transcat Presents Automating and Documenting Temperature Calibration
Ron Ainsworth
Business Manager for Process Calibration Tools at Fluke Calibration
In this webinar, Ron Ainsworth, Business Manager for Process Calibration Tools at Fluke Calibration, details the process for Automating and Documenting Temperature Calibration. Ron prefaces his presentation with a brief discussion of why we should automate temperature sensor calibration, three practical solutions to automating temperature calibration, and how to set them up. Ron ends the presentation with a summary of the pros and cons of each step.
Nicole: It's two o'clock. I still see some attendees trickling in but I'd like us to get started. Good afternoon, everyone. My name is Nicole VanWert Quinzi and I appreciate you joining us today. I'll be your moderator this afternoon. Our webinar topic is Automating and Documenting Temperature Calibration. The topic is being presented by Ron Ainsworth from Fluke Calibration.
He is the business manager for process calibration tools at Fluke Calibration. After graduating with a degree in physics in 1998, he started in the Primary Temperature Calibration Laboratory in American Fork, Utah. He has since had roles as a laboratory manager and marketing manager at Fluke. We expect his presentation to last roughly thirty minutes, and then we'll answer any questions that have been submitted during the presentation. As a reminder, during any time of the presentation, you can send questions through the question box to the right in your webinar control. I also want to mention that this webinar is being recorded. Each of you will receive a follow-up email in a few days with the link to the recorded webinar and the slides of today's presentation. Now, I am going to turn the presentation over to Ron.
Automating and Documenting Temperature Calibration: Agenda
Ron: Hi. Thanks for being here. I am happy to be sharing this presentation with you on automating temperature calibration and documenting it. I think there are some useful ideas here that you may want to consider implementing in your own calibration processes. With automation, there is a few different reasons why you might want to do this. My presentation didn't advance. There we go.
Why Automate Temperature Sensor Calibration
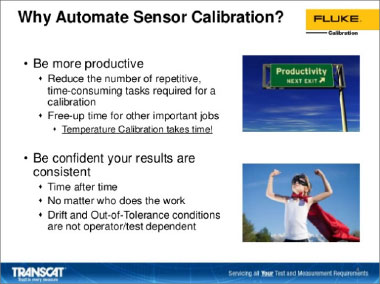
One of the reasons that you'd want to consider automating temperature calibration would be to be more productive. If you've got several repetitive tasks that can be time-consuming and pull you away from other things that you could be doing when you're doing the calibration manually and when you automate, of course, you can avoid doing those repetitive tasks and be taking care of other business or maybe go make yourself a cup of coffee. At any rate, you can be more productive with automation.
The other side though is that aside from being able to step away and do something else, you can also be confident that your results are consistent. It'll be done the same way every time, because you have programmed it to do it the same way, every time. That way, you are confident that your results are consistent no matter who does the work and that your results are going to be more meaningful in terms of determining things like drift or out of tolerance conditions, et cetera.
Back to Top of Page ↑
Three Practical Solutions to Temperature Calibration Automation
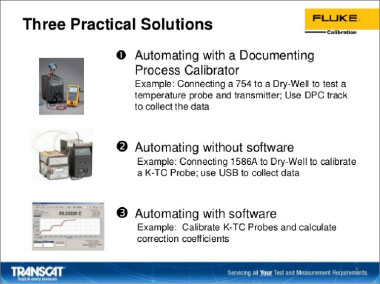
We're going to be looking at three practical solutions to doing automation of a temperature calibration.
- One method is that you may or may not know that a Fluke dry block or a micro-bath can be automated by a documenting process calibrator. It's not just something possible with the Fluke instruments but it is one of the leading methods of doing this. The 754 connected to a dry block. We will talk about how and why you might want to approach that type of calibration.
- The next one would be automating without software. The documenting process calibrator, by the way, you would need to use DPC/Track to collect the data. That's differentiating it from the next one, automating without the software. The 1586-A can be connected to a dry block to automate it and collect the data also. We'll talk about how that works and pros, and cons.
- Then the third is using software for performing the automation. We'll run through an example of that and again, talk about the pros and cons of using software for automating the calibration.
Automating with 754 Documenting Process Calibrator
The first option that we're going to talk about is using the 754. The 754 can be connected to any of the Fluke dry blocks or the micro-baths. You can configure the test by- if you've used a 754 before, you know that you can choose whether you are going to be sourcing pressure or temperature and that sort of thing. When you source the temperature, you can choose to source an RTD or a thermocouple, where it simulates those values, but there is a third option, you can choose to source with the dry block. That's what we're going to be talking about is how you would source with a dry block or micro-bath for that matter. Then you can measure, whether it's a thermocouple output or a 520-milliamp transmitter, we're going to go through an example of doing it with a transmitter. You can set up a simple routine that'll go through various temperature points and we'll discuss how that works.
In results, they may all be stored in the 754, but when you want to pull them out and use them for reporting or documenting and all that, DPC track software is what you would use to collect and organize all the data.
Why is a Dry-Well Required?First off, I'll answer the question of why the drywell is even required. Many of you may already be using the 754 to perform temperature calibration and never used a drywall before, and wonder what the reason we even need a dry block is. When you are simulating a thermocouple or RTD or sourcing the voltage or resistance from the 754, one of things that you are doing is neglecting the temperature sensor. You've disconnected it from the circuit. You are just focusing on whether the transmitter is reading correctly. It assumes that the temperature sensor must be perfect, but all sensor drift over time and when you ignore the temperature sensor you are ignoring the largest source of air. [Rosemount 00:06:34] estimates it to be about seventy-five percent of the air in a temperature measurement, involving a temperature sensor and a transmitter, which you can see on the left is just an illustration of a process with a temperature sensor inside of vessel. Then, it's connected to a transmitter. The green item there, and then that's being read in a control room on a panel somewhere. |
 |
You can see that if I've got to disconnect that sensor and hook up my 754 to it, like you see over on the right, I am not even testing the sensor. It could be drifting. It could be experiencing all kinds of misuse and I wouldn't even know it. That's why we want to include the dry block. The dry block is going to help us include the temperature sensor in the calibration.
Temperature Loop Calibration
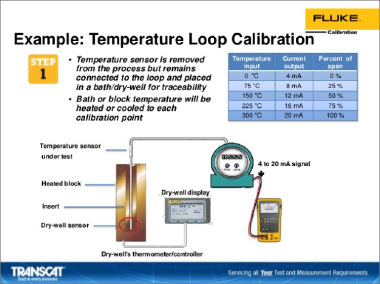
What does that entail? The first thing that we need to do is remove the temperature sensor from the process and put it into the dry block. It remains connected to the transmitter and we connect the transmitter, the four to twenty million output to the 754. What we're going to be doing is changing the set point temperature on the dry block via the 754. We'll have the temperature set points pre-programmed and a delay. Let's say we set it to every twenty minutes. It's going to change the temperature to a new temperature. Wait twenty minutes, and then take a reading. I might go through zero degree Celsius and seventy-five, one-fifty, et cetera, and then the current output, you can see in the second column on the blue table up there, would be some milliamp output that would be read by the 754. It would keep track of the temperature reading from the dry block and the output from the 754. That's the concept here.
How does the dry block know what the temperature is? If you look down in the bottom of that red circle, there is a control sensor down there. It's a little RTD that's in the block that measures the temperature, right at the bottom of the dry-well. The display on the dry block is what's also recorded by the 754, through the communication. How does it communicate? It looks like this. We do need to connect the 754 to the transmitter. I've just got a little illustration of the connections there on the left, but then on the right here, we need to hook up a special cable to connect to the dry-well.
Fluke Milliamp Loop Calibrator Selection Guide:
Transcat.com/calibration-resources/selection-guides/fluke-process-tools
Making Connections with the Hart Dry-well Cable
It's called the Hart dry-well cable. That's the model number, and then for your convenience, I've got the part number, the Fluke item number also listed right there as 211088. What it consists of is it's an RS232 cable with a lemo connector on one side, and it's got a special no-modem connector on the other side to make sure that all the connections line up correctly when you connect it to the zero port on the dry block. The kit also can allow you to hook that to the smaller hand-held dry-wells, as well. As you can see, it's got the stereo jack connection that goes with the smaller dry block calibration.
<p >The last step is you are going to hit – not the last step, but the last one on the slide is you are going to hit the Hart button, the little yellow button I've got circled in red. Then, it's going to check the transmitter for its configuration.
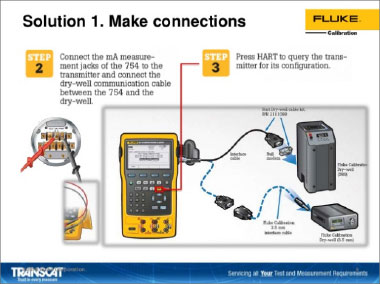
In the setup, I've got to go and enable the loop power on the 754, and then I am going to measure milliamps and source dry-well, as we talked about before. You press the Hart button to get that done. Then, I am going to select "as found" to configure it for documenting the "as found" part of the test. When I get into the "as found" there'll be several options for me to go ahead and select the time interval I want, the temperature to change at, and the number of temperatures that I want to do, whether I want to go up or down, or up and down, and those kinds of things.
Options using Fluke 754 as Control
The kinds of options I have, as I've mentioned before, there is a wide variety of temperature sources that can be used with the 754. All the Fluke dry block calibrators, you can automate with the 754. In the kinds of measure options that you've got, as I've mentioned before, you've got the four and twenty milliamp loop power. You can measure the output of RTDs in Ohms. You can measure thermocouples in RTDs and that sort of a thing.
Now the key thing to remember is that if you are looking to get a 754, remember that you do need to have the DPC/Track software as well to be able to complete the documentation part. You want to download the results to your computer and keep track of your assets. That's what the DPC/Track software would be for, to print a variety of standard reports with it.
Two Temperature Application Resources
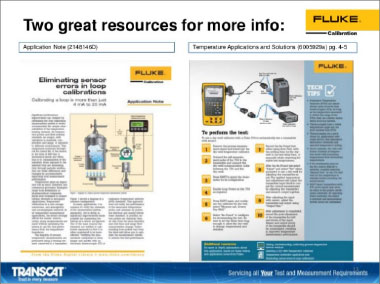
We went through this quickly to give you the main ideas, but we've got some application that's out there to help you to be able to do this on your own. We've got an application on the left called Eliminating sensor errors and loop calibration that walks you through the screens of setting up the 754 with a dry block. Then you'll recognize some of the illustrations over here on the right in the presentation. There is a brochure, catalog, application kind of a document that we have got called Temperature Applications and Solutions that I believe you can download from the Transcat website that covers many different applications, including this one walking you through the steps of doing it.
Back to Top of Page ↑
Now, the next solution that we want to talk about is automating with the 1586A Super-DAQ. Now you may not be that familiar with this product. It is a pretty versatile tool. It's a read-out. You use it for measuring thermocouples and RTDs, and it's great for calibrating in a large volume, if you need to. That little DAQ stack is the instrument on top of the 1586A in this picture and I can connect to twenty different probes to the top of that instrument, and calibrate them. That's cool. I can get a lot done, whether I am doing calibrations in bands or I am doing a profile of an environmental chamber, lots of things you can do with it. Aside from its functionality and being able to read a lot of data and do it very quickly, up to ten measurements per second, I can automate the dry block. I can connect it with RSD32 and set the temperatures, collect the data and come back, and just collect it with a USB port. No need for software here. Although, if software is helpful, there is a lite data collection software program called the Fluke-DAQ 6.0 that does come with the instrument. We're going to talk about doing it without the software.
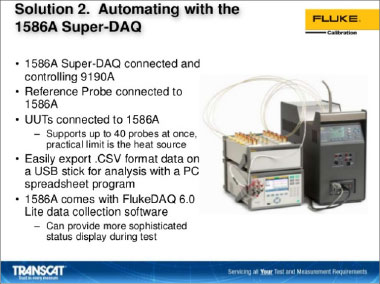
- One is with this high-capacity module, where I can have a fixed set of probes that are connected to it all the time. That might be great for profiling chambers and then this other is with the quick-connect DWF connectors on the top. I just press the button down to easily connect my thermocouple of my RTD. Either one of those can be used for making the connections to the probes and I can connect to twenty megabytes of data, as much as you need, and the PRT is quite accurate, up to plus or minus 0.005 degree Celsius, thermistor is 0.02. It's a very useful tool.
- It can control all the Fluke temperature sources. The 9118A thermocouple of furnace down at the bottom or it can control Fluke baths or dry-well. You name it, it can control it. It's a pretty powerful tool in that regard.
Automating Temperature Sensor Calibration without Software
How do I set this up?
- First thing I need to do is connect the dry-well to the 1586A through the serial connection, and you use just the regular RSD32 cable that comes with the unit. That's one difference between this method and the previous method is I did need a special cable to pull of the automation with the 754. This one, it comes out of the box.
- I insert the probes.
- I connect them to the 1586A.
- And then I just start pressing the buttons on the front panel. The first is channel set up.
- I select all the probes that I want to measure.
- Then I press "test set up." There, I am going to determine what set points - that's the screen on the upper right here that shows what that looks like. I can add as many set points, just about, as I want. I also will determine what's the tolerance that I am going to accept on that set point.
For example, I can hold it within a degree or a tenth of a degree, or even hundredth of a degree. It won't take the data until it gets inside of the tolerance and it also won't take the data until it meets the stability criteria that I'll set on the screen. It will also wait until I have completed the soak time, if I also wanted to make sure it waited a certain period. Those are unique features about automating with the 1586.
I start the test, and then the results are stored on the 1586A internal memory, and I can collect it with a USB. There is an application that we have written on all the details of going through and setting up the automation for this and there is obviously details in the manual, as well, but the app, I've got the reference in the bottom right here.
Fluke Calibration 1586A Super DAQ Results Display
The last thing is what these results look like. They are stored on a CSV style format; they are easily read by Excel or any other analysis reporting tool that would read a comma delimited file. There is going to be two files that are stored with each test. One is a setup file that records all the configuration details. Now you can store a bunch of different configurations in the 1586A. You can also record what those configurations for in that report. Then the data, which you can see in the bottom right. It'll have all the data that was recorded. You can use that for your data analysis. Go and create your calibration coefficients, your tables, using whatever method you prefer.
Back to Top of Page ↑
MET/TEMP II Temperature Calibration Software v5.0
The third method that we want to talk about is using MET/TEMP II. MET/TEMP II is a software method of automation. If works with all the readouts and temperature sources in the Fluke lineup, except for the 1586A. The instrument we just talked about that it could automate everything on its own. It's not supported by MET/TEMP II, which is, I wish I could report something different but, for disclosure those two don't work together. The interesting thing about MPET/TEMP II is that I can control many different temperature sources with it.
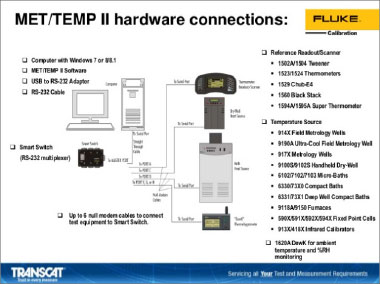
You can see that it's not just software. It comes with some hardware. At the bottom, right, there is a smart switch and you might be able to see that there are some RS232 ports. At the bottom, there is two RS232 ports that you can connect to six instruments with the smart switch and it's connected to your computer. One of the cool things about MET/TEMP II is now if I've got to cover a wide temperature range, I can hook up baths at different temperatures or dry blocks at different temperatures. When one portion of the test is finished, move my probes over to the next portion. MET/TEMP II will collect data, make sure that all the data for the probes stay together. It will even help generate the report, the coefficients, the tables and all that? It's a wonderful way to avoid … sometimes, a good deal of confusion can happen when you are writing down or collecting in different ways all the different probe results and this way, it won't get mixed up.
It'll get done without you having to stand there, waiting for it to be done and again, you can cover your entire temperature range, because you can have the multiple probes. You can watch is go in real-time, see how the stability is looking and watch the data as it's being collected, if you want to. You can use this program for thermocouples, RTDs, SPRTs, but for doing SPRTs, it depends on how careful you want to be about the RTPW values. Some people want to do an ITS90 calibration. They want to collect the triple point of water after every temperature point. This is going to use an average RTPW value.
You can do liquid and glass by Metallica. Pretty much, your entire workload, you can manage with MET/TEMP II and it is a unit that again will support all the different read-outs, probes and temperature sources that we offer at Fluke, except for the 1586A.
MET/TEMP II Hardware Connections
This is what it looks like when you're setting up a program, not exactly laid out like this but these are all the items that you take care of when you are setting up MET/TEMP II. You've got to take care of the communication side with the comp port, the RS232 and setting up the smart switch. It's got to all be connected to the computer and the RS232 cables need to be connected to the various instruments that you want to control. Then in the setup, you are going to choose your reference read-out and your temperature sources. You can even, as you can see on here, collect data from the 1620A DewK temperature and humidity monitoring unit that we've got. That way, you don't have to be manually recording the temperature and humidity during the test. It's all being done automatically and that's another great reason to do automation this way with software.
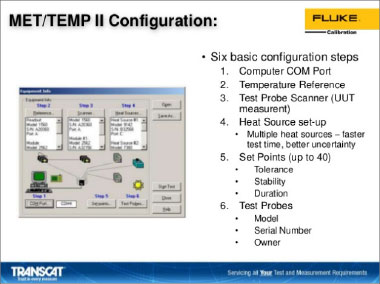
MET/TEMP II Configuration
This is what the actual program looks like. It's simple and that it walks through each of the different steps. You go from step one to two, to three, and to four. It'll help you to choose the right instruments for your test, and then you start the test up. It is a pretty simple way to automate your temperature calibration and I think, aside from all the time saving that comes from doing the automation, we love being able to run our calibrations overnight, when we can do it all in one bath or one dry block, coming back in the morning and collect the data. Aside from that, with temperature, you've got a bit of work to do to take all the temperature and resistance pairs, and turn them into calibration coefficients for the RTS90 or CVD generate a table or report, and that's where I think the software is particularly useful, because it will do all of that for you.
MET/TEMP II Run Time
There are not very many people that have got all the skills to be able to do that and say Excel or something like that. So, the run time in a MET/TEMP II will keep track of the elapsed time. You can see how long the test has been running. You can see which set points you are on. It'll keep track of the tolerances. You will be able to see how close you are to the set point, what the stability is. It indicates which temperature source is being used now. You can keep track of your reference readings and the output from the unit under test. All of that can be displayed on the computer screen if you want to monitor it there.
MET/TEMP II Results: Calibration Coefficients
Then, as I mentioned before, you can generate all your calibration coefficients for PRTs, thermocouples, thermistors. You can do it in ITS90, CVD, IPTS68. For thermistors, you can do the Steinhart-Hart. You can even do Polynomial equations, if that's what's needed for your read-out or requirement. It's a pretty capable piece of software for completing the automation.
Reports look like this. There is some customization that you can do to the reports, but it'll put in the model and serial number, your address and whatever you need on there, in addition to the results of your calibration it'll indicate what the actual values were, what the unit under test read and it'll indicate the residuals. The difference between what the indicated value was and what the ideal curve should have been, that's a nice way of determining how good the fit was for your calibration. If you take enough calibration points those residuals will be a great quality check to tell you something looks wrong with this curve and maybe, we had something get messed up. Maybe go back and check a point or two. In some cases, you might have to redo a calibration, if you catch that you made a mistake.
Without some analytical check like that, you may never even know that there was a problem with the calibration. A useful thing. I'll list all the test equipment, of course, along with the re-cal dates for your traceability.
The tables. A very handy way and your customer will appreciate it too, because they might not have a fancy read-out and maybe they are using DMM or they want to be able to double-check something, and the table can also be printed by the software.
Back to Top of Page ↑
Automating and Documenting Temperature Calibration: Summary
We'll jump back to the questions in just a second. I'll do a quick summary then of what we walked about. With a D754, we can do calibrations of PRTs, thermocouples and transmitters. I didn't mean to have thermistors there but transmitter, but the 1586A, we can cover PRTs, thermocouples and thermistors. You could read a four to twenty milliamp output from a transmitter but you could not power the loop with the 1586A. With the MET/TEMP II, I can do all the SPRTs, PRTs, thermocouples, thermistors, liquid and glass fiber metallic thermometers but I don’t do four to twenty milliamp outputs from the transmitters. When you are doing stuff in the field, 754 and the 1586A, the 754 is better if you are doing it with transmitters. 1586A could be done in the field without having to have a laptop, but it's just going to be reading the output of PRTs, thermocouples and thermistors.
Then, when I am talking about, if it's important for me to have documentation, I'd be more interested in the 754 if the thing that I need to be able to do is I am working this in a laboratory and I need to produce calibration reports and coefficients and all that, I am leaning towards MET/TEMP II. Just for a powerful way to automate the collection of all the data and collect it, it's hard to beat the 1586A. It's got some real capability there.
One of the things also by the way I wanted to mention with the 1586A is I can watch the data graft out onto display in real-time, which can be useful for seeing how stable things are and troubleshooting, and all that. Nicole, did you want to do questions now or come back to that?
Nicole: We can do questions now, but if you would just go to the next slide so I could talk to the…?
Ron: You bet.
Nicole: I am going to go to the questions and as a reminder, if you'd like to submit a question, you can send it through the question box. Your webinar controls is on the right side. I just wanted to highlight a promotion that's going on through the end of the year. If you purchase, depending on your purchase value, you can receive a free Fluke or Fluke calibration tool up to a thirteen hundred and fifty-dollar value. If you'd like details on that you can go to Transcat.com/deals. If you go to the next page, my contact information is on there for everyone. Again, I am with Transcat. My email is there, phone and our website, of course, if you have any questions after the webinar, feel free to contact me. I am going to start with the Q & A right now.
Back to Top of Page ↑
Questions and Answers
1. How long should the delay be set between measurements for the 754? ➩
2. Is MET/TEMP II compatible with non-Fluke products? ➩
3. Does DPC/Track come standard with 754? ➩
4. Why can't I use a serial cable to connect the 754 to a dry block? ➩
5. Can I use a reference probe on automating calibration with the 754? ➩
7. Are there any issues using a 753 rather than a 754? ➩
1. How long should the delay be set between measurements for the 754?
That's a good question, because one of the things that probably I would like to emphasize maybe just a little bit more is that with the 754, it just changes the set points on a timer. You do want to be careful about setting that delay. The way you do it is you look at the specifications on the dry block and when it's going up in temperature, there will be a spec for how long it takes to get to a temperature set point within a temperature range. You'll want to take that value, like let's say it's ten minutes to get to three hundred Celsius, you want to take ten minutes. Add to that some amount of time for it to stabilize. There will often in the specs be a stabilization time, as well. Maybe it's ten minutes plus two minutes, and so you've got twelve minutes, and you would set the delay in that way.
Now also, when you set the delay on the 754, it's in seconds. I take that twelve minutes and multiply it by sixty to get to the number of seconds in the delay. Then, what it will do is change that temperature to the new set point for every set point on that delay. You want to base the delay on the maximum one in your run. Great question.
Back to All Q&As ↑
2. Is MET/TEMP II compatible with non-Fluke products?
MET/TEMP II is not compatible with non-Fluke products. It is compatible with all of them except for the 1586A, but it would not be compatible with non-Fluke products.
Back to All Q&As ↑
3. Does DPC/Track come standard with 754?
DPC/Track is something that you would need to order separately. It does not come with the 754. That would be a pretty important point is getting the 754 will not get you DPC/Track.
Back to All Q&As ↑
4. Why can't I use a serial cable to connect the 754 to a dry block?
The 754-serial connection has got a couple of pins in it that are not lined up with the correct pins in the dry block. There is a special connector that comes in the kit, it's called a [no-modem 00:34:18] that will switch those two pins around so that it does connect to the right part of the right place in the input for the RS232 on the dry-well. If you try to make the connection without those, it just won't work. It is necessary to purchase the kit. Again, it's a Hart dry-well cable kit.
Back to All Q&As ↑
5. Can I use a reference probe on automating calibration with the 754?
No, you can't. That's also an important point with the 754 is that I can collect one unit I want to test to the 754. I can't collect data from multiple units and that also doesn't give me a place to connect a reference. The only temperature that you are going to get for the reference temperature is the indicated value on the dry block. You would not be able to use a 5626 to get a more accurate temperature reading. You would only get the reading from the dry block.
Back to All Q&As ↑
6. How long would it take to perform a three-point calibration with a 754, assuming a twelve-minute stabilization time? Is it thirty-six minutes or are there other things to consider?
If you had a twelve-minute stabilization time, we'll just break it up. The twelve minutes was ten minutes to get to temperature, and then two minutes to stabilize, or maybe it's five minutes. Let's say it's twelve minutes. Then the time it would take to complete the calibration, it was three points. It would be thirty-six minutes because it will wait twelve minutes after setting the first set point, then it will take that first measurement. Then it will change the set point, wait twelve minutes, and then take the next measurement. Then it will do it one more time.
Back to All Q&As ↑
7. Are there any issues using a 753 rather than a 754?
No, there is no issue with using the 753. It will also work as well the 744 and I think the 743 also, but that's an older unit. Certainly, a 744 or the 754 and the 753 will all work.
Back to All Q&As ↑
Conclusion
All right. That's it for questions. That concludes our time for today. If you have further questions or would like to find out more about Transcat products and service offerings, please contact us at 800-800-5001. On the web, it's Transcat.com, or you can email me directly at nvanwert@transcat.com. Thank you for joining us today. We hope you got something out of the presentation, and that you continue to join us for our future Transcat e-learning webinars. Thank you, Ron.
Thank you, guys.
All right, take care.
Bye.
Have more questions? Contact Transcat today!
